Last Updated – March 2026
As our license creation tool runs on the command line, it is very easy to integrate it into your website and implement automatic license creation. It is also very easy to change various properties of your created licenses. Which is why, in this tutorial, we will be covering how to automate the license creation procedure.
Note: For this tutorial I will be automating license creation on a Linux server. You may need to deviate from this tutorial’s instructions for setting up on a server running a different OS.
The PHP exec() function
The key to automating your license creation is the PHP exec() function. This will call the license creation program with the various run-time options, using both hard-coded and user-specified options.
Warning: The exec() function is potentially VERY dangerous. Make sure that you thoroughly validate and sanitize any input the user gives used in the creation of the license. Failing to do this could result in catastrophic effects for your website.
The idea behind this will be to generate a string that calls the license creation program, adding on various properties depending on what it is you want to do. This then gets called in the exec() call, and places the new license at a temporary location. Finally, the license will be moved out of the temporary location and into somewhere more appropriate, where the user will be able to download it.
Uploading the License Creator
The first thing you will want to do is upload the license creator to your server. This program is named make_license and is provided with the Pro and Cerberus encoders. Note that the version of make_license you use must be for the same OS as your server, eg. You will need the Linux make_license for a Linux server, the Windows make_license.exe for Windows Server, etc.
Once you have the license creator, upload it to somewhere secure and only locally accessible on your server. In this case, I shall be placing it into /usr/local/bin/, but this can go anywhere safe.
Creating the License
In its most basic setup, the license creator requires two options: a passphase and a location to place the created license file.
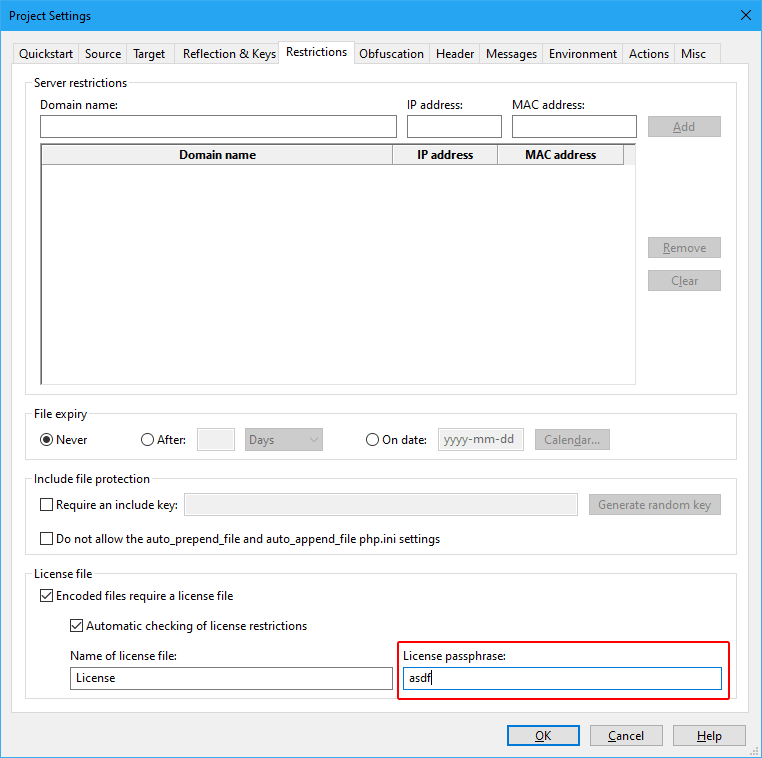
The passphrase is specified using the –passphrase option and will need to match the passphrase your files were encoded with, or it will not work. If you are using the GUI, the passphrase can be found in the following location:
The other required thing will be an output name, specified using the -o option. For this, we would recommend using the PHP tempnam() function, which will return a unique filename. Using the same filename each time is a bad idea, as it creates the possibility for race conditions to occur when more than one license is created at the same time in the same file.
So the following PHP script would create a license in /tmp with a random name beginning with lic_ in it’s most basic form, ie. Without any restrictions in place:
<?php $passPhrase = "ThisIsAPassphrase"; $outputFile = tempnam("/tmp", "lic_"); $execString = "/usr/local/bin/make_license --passphrase " . $passPhrase . " -o " . $outputFile; exec($execString); ?>
Congratulations! We’ve just automated the creation of the most basic type of license. Of course, we will want restrictions in place, which is what we will be covering now.
Setting an Expiration Date
There are two different ways to specify when we want a generated license to expire; They can either be told to expire when a specific date is reached, or after a certain duration after the license was created.
To specify a specific date, we use the –expire-on flag, followed by the date we want the license to be valid until in the format YYYY-MM-DD. So if we want the license to expire on the 3rd of April 2014, we would use the command –expire-on 2014-04-03. However, as this isn’t really the best option to use for this test case, the other option would be better.
This option allows us to specify the duration the license will be valid for after it has been generated. To use this, we use the –expire-in option, followed by the duration in either seconds, minutes, hours or days. This follows the format of [number][s/m/h/d]. So if for some strange reason we wanted the license to expire after 20 seconds, we would use the option –expire-in 20s. We should choose something more realistic for this test case however, so let’s choose 60 days, which is specified by using –expire-in 60d.
Server restriction
In addition to specifying when we want a license to expire, we can also specify which servers the license can be used on.
We can restrict by domain name, IP address and MAC address, though for now we will just restrict to domain name. To do this, we use the –allowed-server flag, followed by the domain name we wish to allow to use the license. So if we wanted to restrict to www.mydomain.com, we would use –allowed-server www.mydomain.com. Note that in most cases, it is often a good idea to restrict to versions of the domain name both with and without the www prefix, as there are some server setups where just restricting to the one with it will not work.
Warning: As mentioned earlier, this is one part where you will want to heavily validate and sanitize the user input before you run the command to create the license. For instance, if no validation was performed and the command was executed with a domain of “; rm -rf /*;” specified, it would likely delete everything on your server. Ensure that code that uses user-specified values are tested as thoroughly as possible!
License properties
The final licensing feature we will cover in this tutorial is how to specify license properties. These allow us to specify how the code will work based on values that are stored in the license file we create.
For instance, if we wanted to have a special edition of whatever our license was for, but we only wanted to encode and distribute our code once, we can use licenses to do just that. We can specify an appropriate property by using –property specialEdition=1. Then, by checking for this property in our code using the ioncube_file_properties() and checking the returned array for the value of the property.
In this case, we could encode two separate packages, one each for with and without the special edition, but this becomes very unfeasible if we want to, for instance, include the customer’s name. This is way too dynamic to include usually, and while you could encode live on the site, it’s a really bad idea to do so, since potential hackers could access the unencoded code, and it takes much longer to encode a full project than to generate a license.
Creating the License Part 2
Using the above information, we can now modify our PHP code to make the created licenses much better suited to this test case.
<?php
function validDomain($domainName) {
if (strlen($domainName) === 0) return false; else return true; }
// Needs properly implementing - validates the user-specified domain
function sanitizeDomain(&$domainName) {}
// Needs implementing - sanitizes the validated user-specified domain
function stripDomain($domainName) { return substr($domainName, 4, strlen($domainName) - 4); }
// Needs properly implementing - returns the sanitized domain without the www prefix
$passPhrase = "ThisIsAPassphrase"; $outputFile = tempnam("/tmp", "lic_");
$specialEdition = true; $domain = @$_GET["domain"]; if (!validDomain($domain)) { echo "Invalid domain specified"; return; }
sanitizeDomain($domain); $domainnowww = stripDomain($domain); $execString = "/usr/local/bin/make_license --passphrase " . $passPhrase . " --expire-in 60d --allowed-server " . $domain . " --allowed-server " . $domainnowww; if ($specialEdition === true) { $execString .= " --property “specialEdition=1"; } $execString .= " -o " . $outputFile; exec($execString); ?>
From this code, we simply open the file, and pass in the domain through the address, eg. license.php?domain=www.testdomain.com . And from here, we have automated the creation of more specific and better suited licenses for our system.