Last Updated – May 2026
In this article we’ll look at how to use ionCube Licensing tools to control and restrict where your encoded files can run. With ionCube Pro/Cerberus Edition products you can protect your source code and restrict that code to specific IPs and domains with Pro, and added MAC address licensing with the Cerberus Edition.
Tip: Before we get started, we recommend also taking a look at ionCube Online Licensing, an online version of licensing tools with additional management options for your licenses. Create and store details of your licenses for easy management and save many hours of development time spent on creating your own expanded licensing manager.
Once you’re done reviewing this tutorial, grab a free trial of ionCube Encoder from our website to start testing out encoding, then take a look at our Online Licensing Portal.
Licensing is a very powerful feature which can be used to control a variety of things. These can vary from determining how your code will run, to if it will even be allowed to run at all for the user running it. That’s why in this tutorial, we will be looking at how to setup a licensing system for your code, and looking at some of things you can do with them.
Note that in order to use licensing functionality, you must have either the Pro or Cerberus edition of our Encoder, as well as the make_license program.
What Is Licensing?
License files are useful when you wish to impose dynamic restrictions on your files. For instance, if your are using a subscription-based business model and you want to extend your code’s expiration date on a user-by-user basis. These make them much more flexible than the ordinary restrictions on the “Restrictions” settings tab. You can even determine which features a user will have access to by using properties.
This is also very useful for getting around the need to encode your files each time a user purchases. Not only is it much, much faster to create a license than to re-encode files, but it means that you keep your unencoded files off of your production server. This instantly makes your code much more secure, as potential hackers will only have access to encoded files, which cannot be modified or easily read.
![]()
Here, we will want to focus on the “License file” section. Enable the “Encoded files require a license file” setting. Once this has been done, the other options will become available. Leave “Automatic checking of license restrictions” on, as this will require you to code a check on the license file manually if it is disabled.
Then, specify a name for the license file that your encoded files will look for, and a passphrase for the license file in the text boxes. Note that the encoded files will check against the license name exactly, so if you tell it to look for “license” and then create a file called “license.txt“, it will not work. Once that’s done, click “OK” to close the window
Configuring Licensing
You will now want to setup the default settings for your licenses. To do this, go to the “Licensing” > “Licensing” menu item.
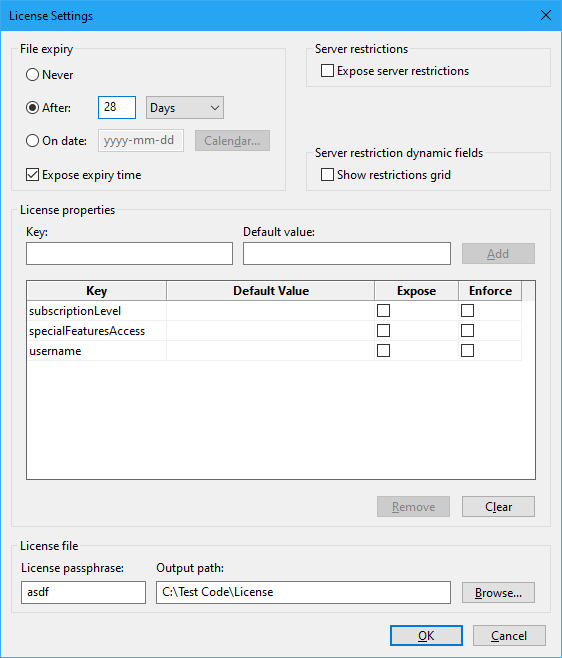
Once you have done this, the following dialogue will be displayed:

From here, you can set the default options for your licenses. Note that you do not create licenses from this window, that comes later.
In the “File expiry” section, you can specify the default time a license file takes to expire. This can be set to either never expire, to be valid until a set amount of time after the license is generated, or to be valid up until a set date. If “Expose expiry time” is selected, the date which the license will expire on will be displayed as plaintext at the top of the license file.
In the “Server restrictions” category, if “Expose server restrictions” is set to enabled, the set of servers that are allowed to use the license are displayed in plaintext above the license file.
In the “Server restrictions dynamic fields” category, if “Show restrictions grid” is set to enabled, the license creation and restriction table is displayed in the “Custom Settings” tab on the main window. This can be used to quickly create license files for different servers. Note that this functionality requires the Special Edition GUI.
In the “License properties” section, you can specify custom properties and options for the license to have. These can be used to make the encoded files act differently depending on checks implemented by the developers. Each property requires a key name, though they can also optionally have a default value, can have their values exposed in plaintext at the top of the license file, or can have it’s name and value enforced against matching properties in the encoded files.
Note: If you have the Special Edition GUI, placing a “?” in the value field will allow you to specify the value from the “Custom Settings” tab on the main window.
In the “License file” category, you’ll see your passphrase from the previous dialog has been placed in here. The only thing you will need to do is to give the license file a default location and filename to save to.
Creating the License
Now that your license settings have been configured, you should save your project file and re-encode your PHP files to ensure they have the latest settings. Once this has been done, select the “Licensing” > “Create License” menu item.
Once this has been done, you should see the following dialogue:
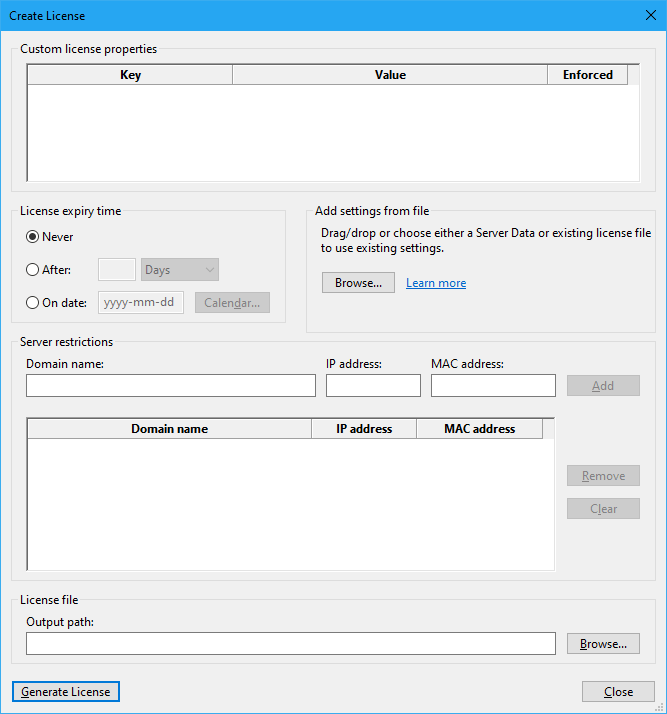
Here, you should see the expiration date and custom properties you specified in the last dialog. You can change the values of the properties here, but not the name or number of properties. You can also change when the license file will expire.
In the “Server restrictions” category, you can specify which parameters must be correct on the server running the encoded files. You can match against domain names and IP addresses, and if you are using the Cerberus encoders, against MAC addresses. Domain names can contain wildcard characters (in this case, *) to match against multiple domain patterns.
Once it’s been setup, press the “Generate License” button, and it will create the license file for you.
Deploying the License
Once the license file has been created and the Encoded code has been deployed, the license file needs to be placed in a location where all the files requiring a license can find it. Usually, the best place to put the license is in the root directory of the Encoded code folder or the root directory of the web server. Encoded files will automatically search in the folders above where they are located to find a valid license file.
Note: The license file must have the same name as the file the encoded files are looking for, else it will not work.
Example
Suppose we want to setup a subscription based model to use our code, and there are various levels of subscription that give access to different features. Instead of encoding different files for each subscription type, we can configure this all using licensing.
First, we set up the default license settings as follows:
Then, we create and encode a file with the following sample code:
<?php

$licenseProperties = ioncube_license_properties();

if ($licenseProperties === false)
{
    echo "Unable to read license properties.";
    return;
}

$specialFeaturesAccess = $licenseProperties['specialFeaturesAccess']['value'];
$subscriptionLevel = $licenseProperties['subscriptionLevel']['value'];
$username = $licenseProperties['username']['value'];

$fileInfo = ioncube_file_info();

if ($fileInfo === false)
{
    echo "Unable to read file information.";
    return;
}

$expiryTime = $fileInfo['FILE_EXPIRY'];
$expiryTime = date(DATE_RFC850, $expiryTime);

$availableFeatures = array();

switch ($subscriptionLevel)
{
case 3:
    array_push($availableFeatures, "Pro Feature 1", "Pro Feature 2", "Pro Feature 3");
case 2:
    array_push($availableFeatures, "Standard Feature 1", "Standard Feature 2", "Standard Feature 3");
case 1:
    array_push($availableFeatures, "Basic Feature 1", "Basic Feature 2", "Basic Feature 3");
    break;
default:
    break;
}

if ($specialFeaturesAccess == 1)
{
    array_push($availableFeatures, "Special Feature 1", "Special Feature 2", "Special Feature 3");
}

echo <<<HTML
<html><body>Welcome, $username!<br />
Your license is valid until $expiryTime<br />
You have access to the following features:<br />
HTML;

foreach ($availableFeatures as $feature)
{
echo $feature . "<br />";
}

echo "</body></html>";

?>
This will allow us to then use the license file we create to determine which features are available.
So if we were to create a license with subscriptionLevel set to 2, specialFeaturesAccess set to 0 and username set to “Mr. Smith”, we get the following results when we run the file:
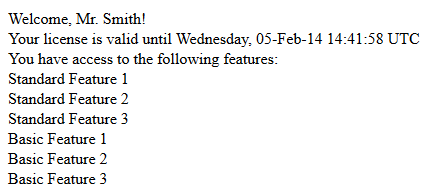
As we can see, we can avoid having to encode every single time someone purchases. We can also avoid having to encode any more times than necessary, and it is much quicker and much more flexible. We can actively change the way our program works based upon what license the user has, and we need only encode our project once.